Johnson Solids

Early on in the semester, my roommate Mathew (with one T) and I were asked by Professor Mark LeBlanc about 3d printing all 92 Johnson Solids. Wanting to do any project we can get involved with, we accepted.
All we knew about these shapes were that there are 92 of them all made by Norman Johnson, a former Mathematics Professor at * Wheaton College (Massachusetts). Unfortunately, he passed away on July 13th, 2017.
We were later interviewed by the campus news (link to article), with less than flattering photos of Mat and me.
A wake was held in honor of Norman Johnson, where all 92 of the solids were put on display in the room being used.
Johnson established in 2000 the Norman W. Johnson Endowed Fund in Mathematics and Computer Science, where annual lectures are held at Wheaton College to "promote better understanding of, and greater appreciation for, mathematics and computing in the greater Wheaton community" (link). I was lucky enough to listen to this year's guest lecturer Moon Duchin discussing the mathematics behind Gerrymandering (link).
* Note: We are not affiliated with the Wheaton College in Illinois
About Johnson Solids
Johnson solids are strictly convex polyhedra that are not uniform, with faces that are regular polygons. They differ from Platonic solids, Archimedean solids, prisms, and antiprisms. In 1966, Norman Johnson published a list of solids with a conjecture that there are no more than 92. In 1969, Victor Zalgaller proved Johnson was right. (Source)
Printing Methods
The first step was to look for the stl files since making 92 shapes was out of the question. Luckily, someone on thingiverse posted a zip file for all of them. When printing, we tested a few methods to save time and materials.
One was to use the "spiralize outer contour" option. This mode would start by making a solid base (about two layers thick), and print the rest in one continuous motion. Imagine tracing the perimeter of the shape without stopping, with the z-axis slowly lowering the build plate. This printing method is common for "spiral vases", where vases are made using the same technique and are one layer thick. It was promising, until Mat squeezed the pyramid, noting how flimsy it was.
For our second try, we printed under normal settings, except we changed the infill to 0%. This made the wall layers 0.8mm, making the prints solid enough to hold while not using an excessive amount of filament.
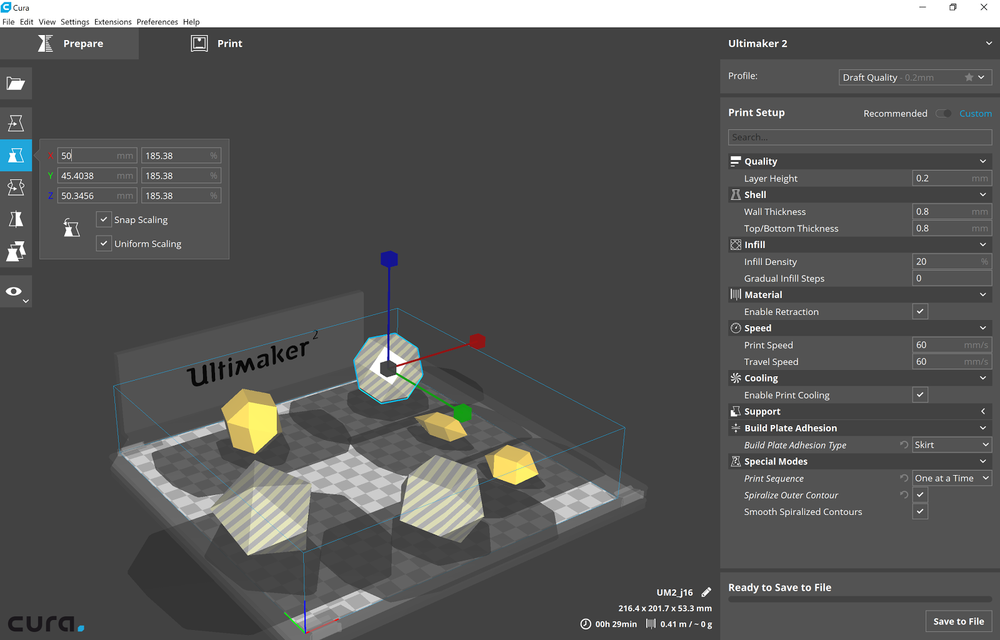
We printed them one by one and gradually increased how many can fit on a build plate to about six. Filament tends to soak up moisture, so stringing became a huge problem. In the settings, I switched over to printing one at a time, which allows one object to print completely before moving onto the next. The only drawback here is that the printing height is restricted to about 50mm, or else part of the printer gantry (metal bars the hotend slides on) would bump into the model.
I have to admit, the whole process of aligning shapes in the software was extremely tedious. It once took me 30 minutes to place and resize the models due to the software lagging after every adjustment made. My laptop being a surface book with a separate graphics card in the keyboard made me realize that I needed to switch over to the more powerful GPU. It was defaulting to the weaker one that comes paired with the processor. It helped a little bit, but the whole process still took a good ten minutes.
I only mentioned print settings and adjustments above, but we also had to switch between five different spools to make the solids colorfully diverse. The reason you see more colors in the article that I mention is that we printed with multiple printers. I printed with my Ultimaker 2, and we also used the MakerBot printer we have on campus. We made use of the college's printer (since only one works), but sparingly, due to the load of problems I run into when using them.
Rant On Makerbot Printers
Wheaton College (Massachusetts) has a Makerspace on campus with two MakerBot printers (5th generation). They are very expensive, each currently costing $2500, with awful printing quality. The only way I can make sense of this is by the faulty extruders sold by the company a few years back. Ever since I came to this college, the printers constantly jam, creak while moving z-axis, or produce very low-quality results. Any 3d printing enthusiast knows that leveling the buildplate is crucial for the first layer of every print to stick to the platform. MakerBot attempts to make this process idiot-proof by having software to calculate the precise height of the nozzle (with some sort of pressure sensor built into the nozzle). The two spring-loaded knobs push up against the buildplate, one in the center and the other to the right side of the plate, which is then pushing against the nozzle to get an accurate reading of its height. What's unbearable is the fact that I'm stuck turning the two knobs back and forth with the printer unable to make up its mind which way it should go. I believe the sensor is busted, which means we'll have to buy another $100+ nozzle just to get the printer working again (we already have one busted extruder). It's odd to me that the printer has to readjust itself before every print by initially heating up to around 190 degrees Celsius, pushing the nozzle against the buildplate, and heating up a second time to the right temperature. Another word of advice about this printer is its lack of a heated buildplate. Printers without one tend to compensate by having blue painter's tape placed on the platform for the plastic to grip onto. Over time the tape rips, causing the bottom of prints to be messy. The two-step heating process mentioned earlier has the hot nozzle pushing into blue painters tape, messing up the portion where it hits. There's plenty more wrong with this printer, like the necessity of rafts, but that's all I'll mention for now.
3d printers are no longer as expensive as they once were. There are plenty of options for high-quality printers under $1000. My personal favorite, as well as the one I'm persuading the college to buy, is the Prusa i3 mk3 3d printer. It costs $750 as a kit and $1000 assembled, with amazing print quality and unrivaled software enhancements (link). If any reader is considering buying a 3d printer, my recommendation is the Prusa.
Update (2/25/19)
A year and a half later, I convinced Wheaton College MA to buy a total of 7 Prusa printers. They run fantastic and are in the process of being upgraded to the multi-material extruders to print with up to 5 materials/colors. I also got a Prusa of my own and love it to pieces. It prints great and I love how low maintenance it is.